目次
OpenSSH In Windows 10
Connection settings for this article
| Host Name | Login Name | |
|---|---|---|
| Server | Jump_Server | Jump_Server_Username |
| Client | Localhost | Local_Username |
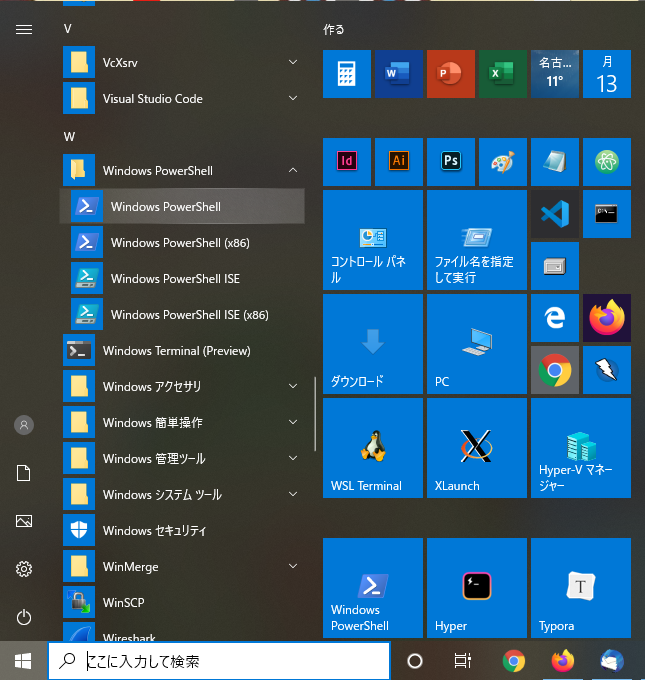
Open PowerShell
Press Start and then press “Windows PowerShell”.
How do I know if OpenSSH is installed?
Check if the OpenSSH client is installed by typing the following command into PowerShell.
PS C:\> gcm ssh | fl

Name            : ssh.exe
CommandType     : Application
Definition      : C:\WINDOWS\System32\OpenSSH\ssh.exe
Extension       : .exe
Path            : C:\WINDOWS\System32\OpenSSH\ssh.exe
FileVersionInfo : File:             C:\WINDOWS\System32\OpenSSH\ssh.exe
                  InternalName:
                  OriginalFilename:
                  FileVersion:      7.7.2.1
...
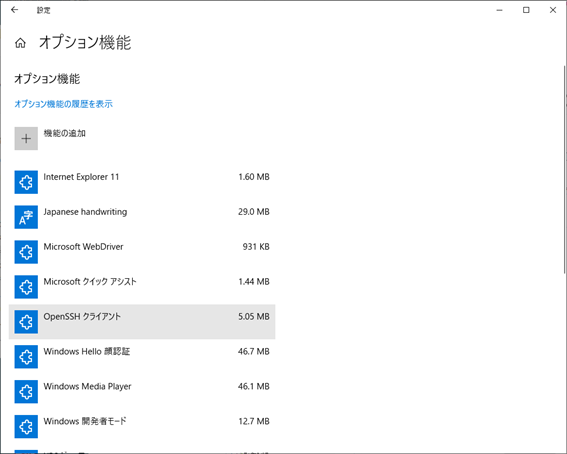
If the details of ssh.exe are displayed as above, it has been installed.
If you do not see it, Windows Update (version 1803 or later) with administrator privileges will install the OpenSSH client by default. If not, open Settings, select Apps > Apps & Features, then select "Optional Features" .
Generate an SSH Key Pair
Generate an ssh key in PowerShell. (After # are comments)
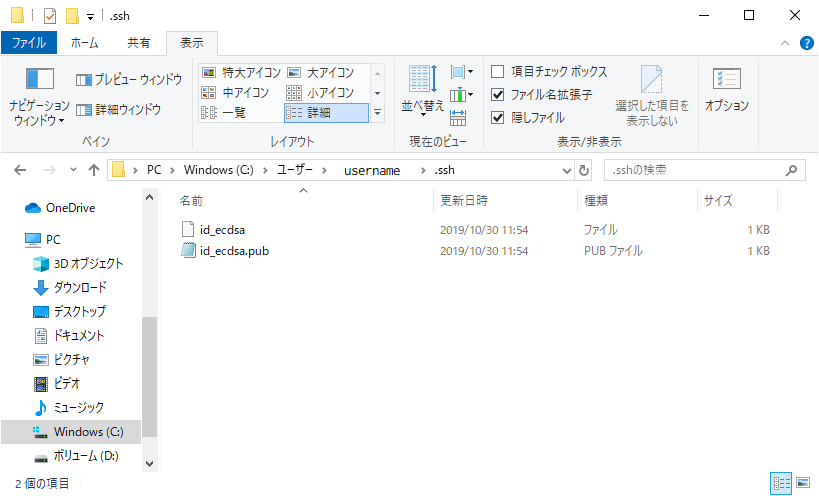
PS C:\> ssh-keygen -t ecdsa -b 384
Generating public/private ecdsa key pair.
Enter file in which to save the key (C:\Users\username\.ssh\id_ecdsa):  # enter
Enter passphrase (empty for no passphrase):  #Enter passphrase
Enter same passphrase again:  #Enter passphrase
Your identification has been saved in test.
Your public key has been saved in test.pub.
The key fingerprint is:
SHA256:UQwYcMTRGPdEDwQ7y4z5OS+j9PhFpavrKZ3W7jEuH1E username@localhost
The key's randomart image is:
+---[ECDSA 384]---+
|    .+*B+**      |
|     .+..=.o     |
|        + . E    |
|       = + +     |
|      o S +      |
|       . o o     |
|      ..+o*      |
|     ..oBB.+     |
|      o*BO*      |
+----[SHA256]-----+
Key pairs are created in the (C:\Users\username\.ssh\id_ecdsa) by default. The key may not be used unless it is placed in a folder under the user.
Apply for a key
Please apply for registration of the created public key id_ecdsa.pub.
Isee Jump_Server account request
CIDAS System account request
Add your SSH key to the ssh-agent
 Use ssh-agent to avoid entering the passphrase for ssh connections and to avoid putting the private key on the steppingstone server.
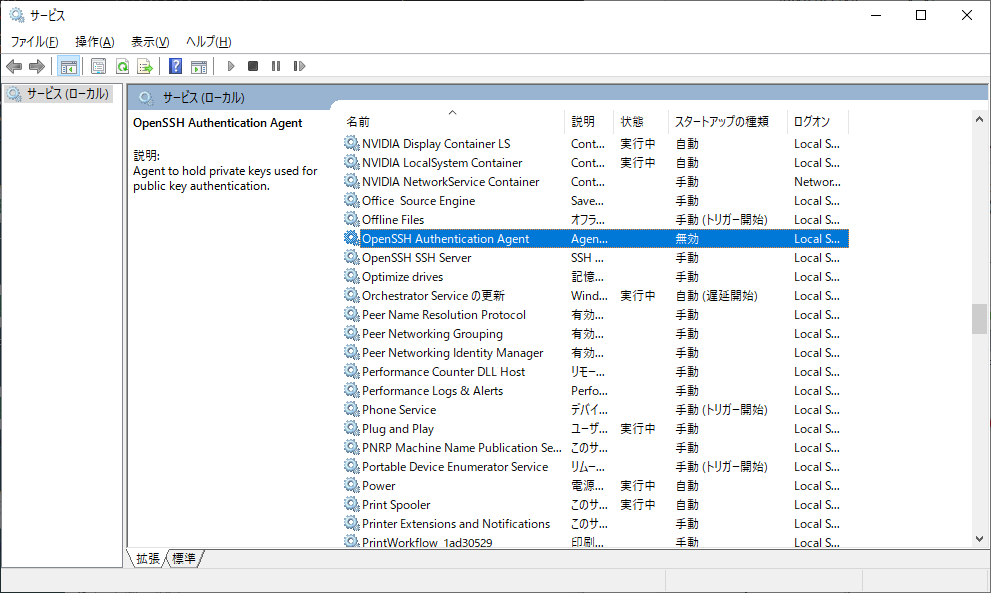
Select Start > Administrative Tools > Services. Open the properties of the "OpenSSH Authentication Agent". Select automatic as the startup type, press start, and start the ssh-agent service (properties).
Next, register the private key id_ecdsa.
PS C:\> ssh-add 'C:\Users\username\.ssh\id_ecdsa'
Enter passphrase for C:\Users\username\.ssh\id_ecdsa: #Enter passphrase
Identity added: C:\Users\username\.ssh\id_ecdsa (C:\Users\username\.ssh\id_ecdsa)
The registered key can be checked with “ssh-add -l”. If you want to delete a registered key, use “ssh-add -D” to do so.
SSH Connection
Enter the following:
PS C:\> ssh Jump_Server_Username@Jump_Server -A
The authenticity of host 'Jump_Server (***.***.***.***)' can't be established.
ECDSA key fingerprint is SHA256:UQwYcMTRGPdEDwQ7y4z5OS+j9PhFpavrKZ3W7jEuH1E.
Are you sure you want to continue connecting (yes/no)?  # yes
Warning: Permanently added Jump_Server,***.***.***.***' (ECDSA) to the list of known hosts.
option -A: Enables forwarding of connections from an authentication agent such as ssh-agent.
After connecting to the Jump_Server, you can use the same private key that you used at the first connection to connect to another server.
x11 forwarding
X11 Forwarding is what gives you the ability to use X11 application window on your local host when connecting remotely.
First, download and install VcXsrv Windows X Server.
VcXsrv download
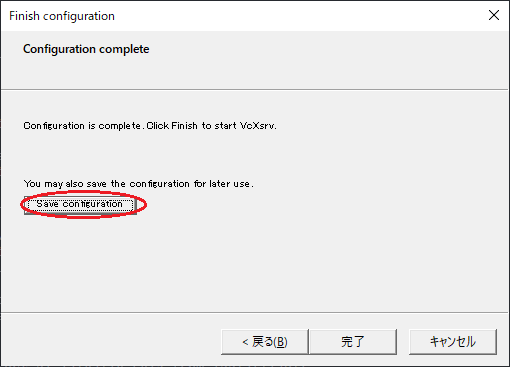
In the startup screen, proceed with the default settings, and in the final "finish configuration" screen , press “save configuration” to save the settings in an appropriate location. The default name of the configuration file is “config.xlaunch”.
By double-clicking the configuration file, VcXsrv Windows X Server will start. To make it start automatically, register it to the startup.
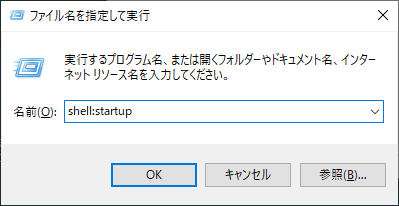
Open Start > Windows system tools > Open Run Command , then press “shell:startup”. Move the configuration file “config.xlaunch” saved earlier to the startup folder.
Next, set the DISPLAY environment variable. When VcXsrv Windows X Server is running, an icon appears in the indicator. When you hover the mouse over the icon, you will see something like “localhost:0.0 -1 clients”, so set this localhost:0.0 to the environment variable DISPLAY. The locaohost part here can be either the local hostname, 127.0.0.1, or localhost.

PS C:\ [System.Environment]::SetEnvironmentVariable("DISPLAY", "localhost:0.0", "User")
Restart PS and check if it is set.
PS C:\ $env:DISPLAY
localhost:0.0
Add the option to allow X-fowarding and make a ssh connection. Start the X11 application and check if the transfer is successful.
PS C:\ ssh -AXY Jump_Server_Username@Jump_Server
File for ssh connection settings
By saving the ssh configuration to a file (C:\Users\username\.ssh\config), the ssh command can be omitted.
Host Jump_Server
  ForwardAgent yes
  ForwardX11 yes
  ForwardX11Trusted yes
  User Jump_Server_Username
  HostName Jump_Server
  IdentityFile "C:\Users\username\.ssh\id_ecdsa"
Connect to ssh with the following:
PS C:\ ssh Jump_Server